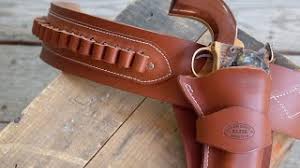
Western equipment—such as the belt-and-holster designs used by competition shooters, cowboys, and other Western enthusiasts — is not just practical equipment. They’re wearable art that blends the ruggedness of modernity with a personal touch. If you’re creating one to use in Old West reenactments, cowboy action shooting, or to keep as a memento, crafting an individual rig will allow you to personalize the look, fit, and functionality to your specific needs.
Understand the Purpose of Your Rig
Before you cut leather, you must decide the purpose of your planning. What are you planning to use your Western equipment for?
Style and historical accuracy are crucial.
Efficiency, speed of draw, and balancing are essential.
Detail, design, and craft take place in the center.
Understanding the goal will help inform your choices of materials, such as holster angle, holsters, and even decorative elements.
Choose the Right Leather
A high-quality rig begins with high-quality leather. Vegetable-tanned leather, which is around 10-12 oz thick, is the ideal choice for belts, whereas lighter leather could be used to make the holster. The leather must be stiff enough to keep its shape, yet flexible enough to allow for comfortable wear.
Design Your Rig
Sketch your belt’s width and buckle type, the loops on your cartridge, and the western holsters style, as well as tool patterns. Western equipment typically has basket weave designs, flower tooling, and smooth finishes to create a minimalist style. Consider:
Straight, contour, or ranger-style.
Straight drop or forward tilt.
The number and the caliber will work.
Cut and Prepare the Leather
Utilizing the sharpest blade or leather shears, cut the holster and belt pieces in accordance with your design. Mark the stitching lines, holster folds, and slot positions before assembling.
Tooling and Decoration
This is where personalization truly shines. The leather should be dampened to facilitate tooling using the swivel knife and stamps to cut out your desired design. If you want a more rugged vintage look, you can leave the leather smooth and then oil it to create a rich patina.
Assembly and Stitching
Fold and wet-mold the western gun belt to fit around an empty firearm or replica to achieve the ideal fit.
Attach the buckle by punching holes and stitching or riveting the loops on the cartridge.
Make use of waxed thread and the saddle stitch to increase durability. If you prefer, a powerful sewing machine will accelerate the process.
Finishing and Oiling
The edges should be buffed for a silky feel, and a leather conditioner or oil that will help protect and make the leather darker. To give it a polished appearance, you can apply an oil-based leather sealer.
Test and Adjust
Use the rig and test for the comfort of wearing it, holster retention, and quick draw access. Adjust those holes in the belt, the angle of the holster, or the loop location as needed.
Tips for a Professional Finish
Utilize buckles and rivets, and snaps to achieve a more cohesive appearance.
Spend money on creating better cuts and more precise designs.
Always ensure safety during the molding process and adjustments.
Custom Western equipment is a combination of functionality, workmanship, and personal design. If you’re looking for a simple working rig or an intricately made-to-order work of art, the process is equally as rewarding as the final product. With the right tools as well as the patience and imagination, it’s possible to create a rig that is uniquely yours and ready to go on the stage, the range, or your display cabinet.